
 I’ve written before about how much I enjoy having the opportunity to install art in clients’ homes. Installations are a great opportunity to provide customer service and build relationships with our clients.
We have many sales where it isn’t possible for us to take care of the installation – many of our clients live out of state (although I’ve done installations as far away as Boston!) and some of the artwork we sell is either too large or the installation too complex for me to handle on my own.
We assist our clients in making other arrangements if we’re not able to help, either by assuring that they are comfortable handling the installation on their own, or helping them hire professional art installers if they aren’t.
On those occasions when I do get to install the art, I strive to make sure I’m fully prepared for the installation, no matter the circumstances. This means we need to learn as much as we can about the installation location. We begin by asking the following questions:
- Where is the art being installed?
- What is the surface? (drywall, plaster, tile, stone, etc.)
- How high are you envisioning the artwork will be installed?
- Do you have a ladder or step stool we can use?
 Once we understand the circumstances of the installation, we set up a time, and arrange to bring everything we’ll need for the installation. I’ve also learned over the years that it’s a good idea to have a variety of tools and hardware in my installation kit for unexpected circumstances.
I have a tool kit and hardware box that I take out that includes all of the following:
- Hanging hooks and pins (we use Floreat hangers)
- Hammer
- Razor knife
- Level
- Pencil
- Tape measure
- Drywall screws
- Drywall anchors
- D-rings
- Plastic coated picture wire
- Screwdrivers (phillips and flathead)
- Pliers
- Wire cutters
- Safety glasses
- White gloves
- Gold leafing repair and nail hole filler
- Rechargeable, cordless drill (make sure it’s fully charged!)
- Hammer drill (when mounting in masonry or stone)
- Extension cord
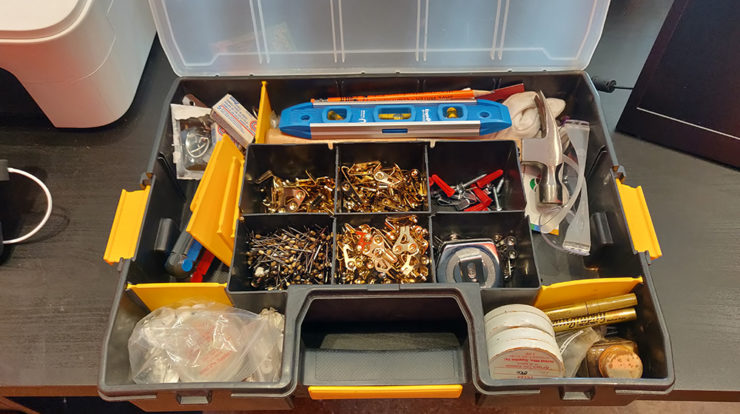
Most of what I need fits in a plastic Stanley organizer (pictured above), and for a typical installation, the organizer is all I need to take into the client’s home. I take all of the other tools in the car, just in case. I would prefer to have a tool and not need it than need it and not have it.
Do You Have an Installation/Hanging Kit?
Do you have an installation/hanging kit? What do you include in your hanging kit? Do you use the kit regularly? Share your experiences and suggestions in the comments below!
This is great. Thanks. I am wondering how you would approach hanging something like this: http://bit.ly/3p0A2fe it is large and somewhat heavy piece of epoxy resin with a painting sealed inside of it. I am not sure if I should be drilling into the pieces or what…
Very cool piece. I’ve seen artists use industrial adhesive to attach D-rings and wire, but adhesive always makes me a little nervous. Would it be possible to incorporate the D-rings into the resin as it’s being poured in the future? Seems like you could also create brackets that mount in the wall and then hold this in place, but you are then going to lose the effect of the clear edge.
Thank you, I have never thought about extending that courtesy of hanging the art for a client!
So thank you for opening my eyes and heart to taking care of my collector down to the fine detail.
Marian Sprecher
Great info about what to have – to be able to install different types of art. I have a specific question though. How do you hang a painting on a plaster wall?
Plaster can definitely be a bit tough. We try and locate studs if possible. If not possible, we’ll use drywall anchors. Especially important to make sure you have enough anchors to take the weight of the art. We always err on the side of using more anchors or hooks than we need.
I hang all my art with 3M command strips. They’re not supposed to be “reusable”, but they are 3-6 times, sometimes more. That being said, they’re not ideal for hanging work that is framed.
Thank you Jason!
Stay organized. Great advise. And it looks PROFESSIONAL
I have rather large works and sometimes smaller works hung in a grouping so I always carry a long, thin string and pushpins to assist in leveling and measuring the works. I start by leveling the string and taking measurements from there. I find it’s more reliable than measuring from the floor or ceiling. I also have small, medium and large levels to use depending on the situation. Same with measuring tapes, hammers, pliers, masking tapes, etc. I’ve been disappointed with cordless tools so I bring the plugger-inners with plenty of extension cord. I agree, in these situations it’s always better to have more than you need standing by in the car. Oh, and spackle, just in case. 😉
Great article Jason. We’ve been a frame shop for 28 years until we opened an attached gallery in the suite nextdoor. We have been hesitating to offer installation services for both art we’ve framed and art purchased in our gallery. My insurance took some issue with it and told us we’d need another policy add-on for installations. No one in the shop or gallery has a contractor’s license, so that’s also a concern. Since you are very experienced in this matter, how did you handle insurance and if you don’t have a contractor’s license, how did you do a workaround? We are in Utah, so maybe laws are different here than Arizona. Thank you.
I’m going to claim the “ignorance is bliss” stand on this one. We provide the installation as an “at-your-own-risk” service to clients. We’re not charging our clients for the installations, and so aren’t, according to my understanding (admittedly based on only a little internet research) aren’t required to have a contractor’s license. I do understand your concerns, and liability is an important issue. At the end of the day, you have to balance the potential risks against the benefits of providing service to your customers.
Awesome Jason!
As always, you go above and beyond for clients as you do for us ABA students in the Art Business Academy.
This is a really fun read and so helpful. Thanks for sharing! 🔨
Thanks, Jason! I know I can always count on your thoroughness and detailed reporting.
I have carried a ‘tool bag’ with hanging box since I inherited my artist mom’s bag, years ago. Sturdy leather, and just the right size, it is a cherished possession! As a prior interior designer with 50% of my work as a colorist, I often found myself asked to place and reinstall art after a home was renovated. With a couple of exceptions, these installs were successful + uneventful, but plaster was the more difficult for sure. Having to use Molly bolts or toggles was always intimidating on fresh walls, and luckily, I didn’t have to use them often.
I have something similar, that I call my “art caddy”. I used it for month long showings at various places. Phillips head and flat head screwdrivers, hammer, pliers, and wire cutters. A can of screws, pushpins and nails, labels, packing tape, wire. In the bottom is all the small parts and fasteners when I used to do full sized shows. Those are too much of a hassle for what they’re worth these days and I only sell small prints at showings, for which I have built two long thin portable shelves for that I can put up in minutes by screwing to the wall. The essence? What you need in your armored box will be a unique mix, learn by doing, customize.
Well, this is a great idea, to have it in a kit, ready to go! I have all the things in a specific area of my art armoire, but this is more efficient. Guess what I am doing this weekend?
Do you know if the nails that come with the Floreat Hangers are high quality? Lately I have noticed that the OOK nail quality is much worse than it used to be, and the current nails bend easily. I will switch if Floreat is better.
Yes – the Florea nails are awesome. I’ve had to change where I order them – I now get tham through https://tradecraftsupply.com/floreat/